Tuesday, December 3, 2013
How to Cure Olives
My morning ritual starts with dropping off 6 of my 7 children off at school. This starts with the countdown. We are leaving in ten minutes! Which usually means we will be out of the driveway in 20. My kids go to three different schools with in about a 5 mile radius. Its a bit crazy but at the end theres a peaceful 10 minutes with my oldest son.
He goes to a charter school that has taken up residence in an old shopping mall movie theater. I never noticed until yesterday that the parking lot is brimming with olive trees that are packed with big fat black olives!
Well I am totally in love with olives and not one to let a good olive go to waste I got permission to pick. My to my children's horror I perched myself on top of our mini van with a plastic bucket left over from Halloween emblazoned with Frankenstein and got to picking!
There was some whining with the typical phrase, "Are you done yet?" Yet only my 8 year old, who loves to climb up into trees, was eager to help. So we picked and picked until I came away with 3 gallons of olives! Yeay me!
The first thing your going to want to do is wash your olives. Put them in a big bowl and cover them with clod water. Gently run your fingers through them and stir them up. The leaves and stems will rise to the top and you can scoop those out.
Lacto Cured Kalamata Style Olives
Olives
2 Lemons (Organic)
2 cups Sea Salt
Olive Oil (How much will depend on your container. You need need enough to cover the tops of you olives)
Water
Next your going to need a very large jar with a lid. I choose a big 2.5 gallon glass jar that I used for making kombucha. Make sure its not one your going to need for a while because it is going to take a couple months to cure your olives! You want your jar large enough to fill to the top with your olives, but not too big that you have a lot of space for them to float.
Next mix your water with the salt. You will want about 3/4 a cup of salt to every gallon. The way to tell if you have enough salt is that a fresh egg will float in the water. If it doesn't float a bit more salt until it does. You will notice my water is a little cloudy, this settles down after the olives are packed.
Cut your lemons into wedges.
Now we are ready to go! Toss in a couple lemons and then start filling with olives. About 1/2 way through throw in a few more slices of lemons and keep filling with olives. Toss in your remaining lemons in the top and finish with a few more olives until your about 2 inches from the top of the jar. Fill the jar with your salted water stopping when you have covered your olives.
Lastly cover the top with olive oil. this will help keep your lives fresh and keep them from getting slimy and nasty. Every day stir or shake your olives and every week you will drain and replace the salt water and olive oil for a month. Changing the brine more frequently will leach out more of the bitter oleuropein.
After one month taste test your olives. If they are still too bitter soak them another week. If you like the taste move on to the final brine.
Final Brine
1 Gallon Water
1 1/2 cup salt
4 Cups Apple Cider Vinegar
1 Head of Garlic, peeled
Olive Oil
In a large pitcher or bowl mix the water, salt, and vinegar.
With your palm crush garlic cloves.
Add a 4-6 cloves of garlic per quart jar. Pack olives to sterilized jars leaving 1 inch space. Cover with brine solution. Top with olive oil until olives are covered. Allow the olives to sit in this solution for one month before use. Do not use if mold develops.
These olives will store will in a fridge for up to a year.
Thursday, November 21, 2013
Alaska Pilot Bread Recipe
There is something I find romantic about selling most of my junk and moving to a little cabin in Alaska with only moose for my neighbors. I love watching the shows like Buying Alaska and Alaska the Last Frontier and dreaming of wearing cute fluffy fur trimmed hats and boots I made from skinning a deer I shot my self.
Then reality kicks me in the teeth and reminds me that I hate being cold and that if I had to skin a deer I would probably puke on my own shoes.
So instead I look for things to give me that Alaska experience with out ever going somewhere that my hair would freeze into little ice cicles. While I dont yet own a adorable log cabin, I did discover a little Alaskan favorite called pilot bread aka Hard Tack, which is actually pretty good.
The down side is that its pretty tough to find pilot bread here in AZ. I searched the internet for a good recipe and I was surprised to not find one. So of course I had to create one my self. I think I came pretty darn close with this recipe and I hope you enjoy it!
- 2 cups all-purpose flour
- 3 tsp baking powder
- 1 tbsp powdered sugar
- 1/2 tsp sea salt
- 6 tbsp cold butter
- 2 tbsp coconut oil
- 2/3 cup 1% milk (2% would most likely work, but I think whole would be too much fat)
- Preheat oven to 325 F.
- Put the flour, baking powder, powdered sugar, and 1/2 tsp of salt in the food processor.
- Pulse to combine.
- Add cold butter a few small pats at a time, and pulse to combine.
- Add coconut oil. Pulse to combine.
- Slowly drizzle in the milk as you pulse the food processor. Your dough will form a ball. Now turn on your food processor and let it run for 4 minutes. you dough will be warm when you take it out and thats ok.
Next we are going to roll out out dough. I like to roll mine right out on the silpat that I will cook them on, that way they dont get all distorted if you try to move them.
- You want to make sure you roll these out nice and thin, about 1/8 inch is good.
- Use a 3 inch round cookie cutter to cut them out. Remove excess dough. Dock the pilot bread all over with a fork, you can get fancy or just stab them all over like I did. I like stabbing them, its kind of theraputic!
- Bake your crackers for 25 minutes and then turn off your stove and crack your oven door and let them stay in the oven until cool. This is what gives you a crispy cracker. If you live in an area with high humidity you may need to dry them out in a dehydrator or a very low oven to get them dryed out.
Your done! Store in a tightly sealed jar and as long as you have fully dryed them out (they will be creispy and snapw hen you break them.) they will store indefinately.
Thursday, March 1, 2012
Easy Peasy wrap dress....
I really love Kimono style tees for a new baby. New babies hate having things pulled over their heads, its no wonder, I wouldn't like it much after going through the birth process either!
I got a great deal on some fabrics at JoAnns yesterday and also picked up some brand new Carters Kimono Tees for 3 for $3 at Ross yesterday. When I got home I started playing with fabrics. I wanted to achieve and easy ruffle skirt onsie type thing without having to cut up the tees, which is more time consuming. Lets face it, easy is my best friend right now.
After a bit of fabric and 20 minutes I came up this little number.
Its a simple ruffle skirt attached to the bottom of a infant kimono tee. Its so easy and fast to make and I hope to put on, I will update when baby Zen gets here to try it on. It no harder than to just snap the tee and tie the sash. I think it will be great for those Sunday's when we are rushing to get ready.
I think I will work on a tutorial and better pictures soon, like all my other projects, LOL. I think next time I will make the sash a bit longer so it can be tied in a bow, but over all I love it.
Thursday, February 9, 2012
Altering a pattern for maternity wear..
Cute maternity patterns are few and far between and while I love drafting patterns they do take some time. Altering a pattern using this quick flat pattern technique, called "slashing and spread" will help you take any pattern you have to maternity.
One key thing you need to remember when altering a pattern is you never, ever want to add width to the outside edges. This creates and ill filling pattern, and while it may look ok in Knits, it will look weird and hang weird in woven fabric.
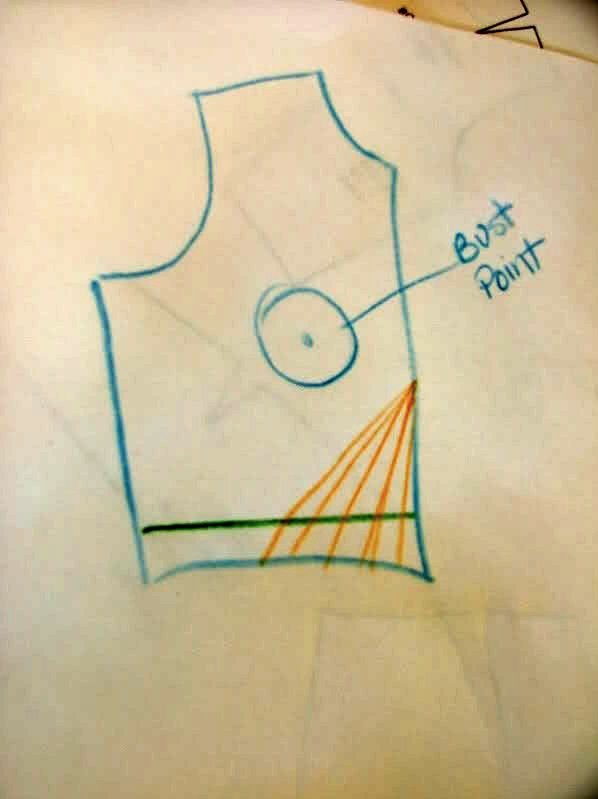
Ok so we are going to start with our pattern. I have drawn a simple sloper sketch to show you how this works. I would suggest tracing your favorite pattern on some butcher paper for this process so you can re-use your pattern after baby. You will want to make this in a size larger than you would normally wear, you will grow when you are preggo.
We are first going to lay out our lines. I am using different colors to show the two different directions we are going to cut.
We will want to first to draw our lines to add room for the tummy. One thing to remember is the more cuts you make the smoother and more neat of a transition you will get. Each line will be cut. So starting below your bust point you will want to draw lines starting from one central point to the bottom of your pattern in 1 inch to 2 inch increments.
Being pregnant with #7 I have found that your belly can grow between 15-20 inches by the time its all said and done, so we are going to do a lot of slashing and spreading. You are going to want to make from 10-20 slashes, although my picture dose not show them all.
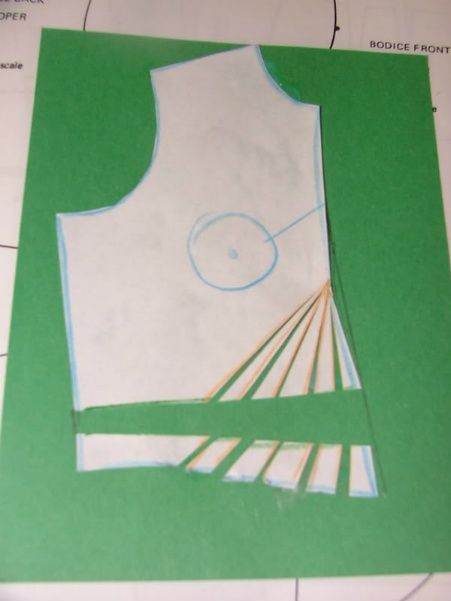
Now we will slash, cutting from the bottom up to the top leaving a tiny bit of paper at the top keeping it attached so we can spread the sections. Place your slashed pattern on top of a new piece of paper. Once you slash your pattern you are going to spread each piece evenly and then tape or glue each piece down.
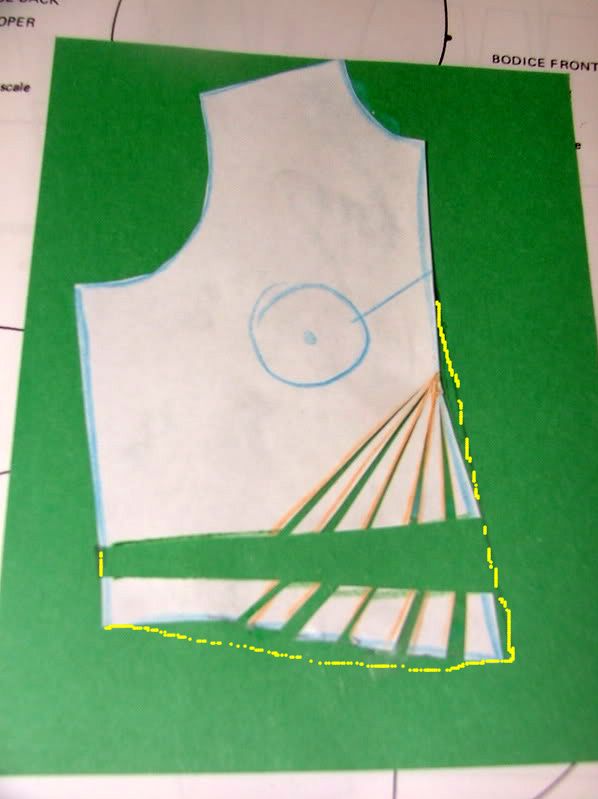
Now we need to add length. We are going to measure 2 inches up from the bottom, and draw a straight line from side to side (shown in the green line in the first picture). Then we are going to spread this pattern starting from 2 inches in the side seam and ending at 4 inches in the center front. You will repeat this spread on the back, but you will only drop the back 2 inches straight across. Tape or glue down your pattern again.
To finish off your pattern you will clean up the outside lines by redrawing your lines. Unfortunately this is a bit faint in the pencil so this is shown in not so straight yellow lines, make yours straight (or follow the original direct of your pattern if it has curves) lol!
You may wan to add elastic or a tie to the front or back to accommodate your growing belly when you sew this. Thats it you pattern is ready to use!
Saturday, February 4, 2012
Memories of Projects past...
As I am putting together this blog I came across pictures of projects I have sewn in the past. All of them are sewn from patterns drafted by me. Enjoy~
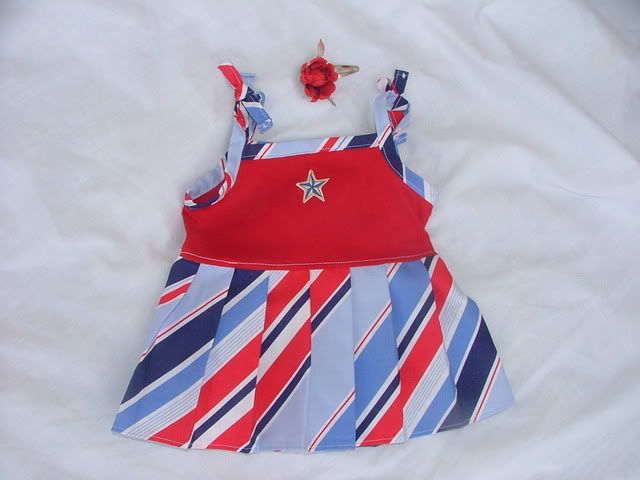
This little dress is a simple pleated dress with a handmade hair clip for a friend. It had a matching red cloth diaper to go with it.
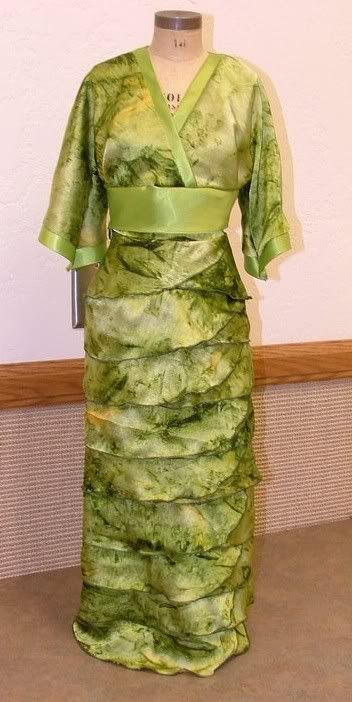
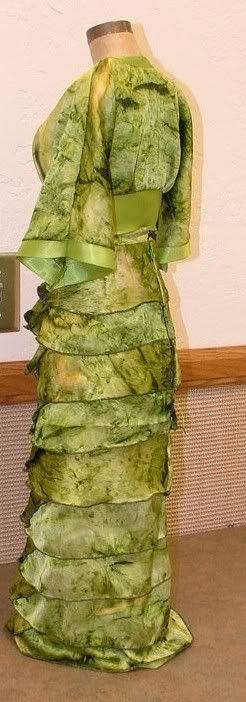
I drafted the patterns for the top and the skirt for this Kimono outfit in my flat pattern design class. The dress is made from silk and satin and was lots of fun to make. It took me about a week to draft the pattern and make the dress.
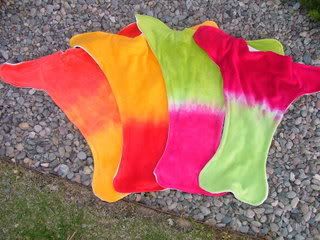
Some bamboo velour cloth diapers from my own pattern and hand dyed by me.
A pea in the pod....
I love, love easy little cocoon swaddlers almost as much as I love drafting patterns. So when I saw the price of buying a swaddler, my little mind kicked in to over drive and in an hour I had drafted the pattern and sewn two of these bad boys.
The orange on is out of a knit interlock and the polka dots is out of a light weight knit. Print out the pattern and have fun sewing this simple project! http://www.scribd.com/doc/80508026/Evolution-Baby-Cocoon-Pattern
The orange on is out of a knit interlock and the polka dots is out of a light weight knit. Print out the pattern and have fun sewing this simple project! http://www.scribd.com/doc/80508026/Evolution-Baby-Cocoon-Pattern
Kimono Dress and Sun Bonnet
I wanted to make something simple for baby Zen, a kimono dress. It will be very warm in May when she comes so something lightweight was a must. After searching I could not find a pattern that I liked, so I pulled out the pen and paper and drafted this simple little dress and bonnet to make for Zen.
The entire dress takes less than 1/2 a yard of fabric and 3 yards of binding and can be made reversible if you want. I didn't because I wanted it really light weight for the summer, although I did make the bonnet reversible, it was super easy and was made for little scraps.
I plan on posting a free pattern soon for both so stay tuned!
Subscribe to:
Posts (Atom)


